


 The anticipation of the spring’s plantings gives hope to gardeners throughout the winter. Get a taste of spring four to 12 weeks before the final frost by starting seeds indoors! Making your own seed-starting mix is economical. And if you compost with worms, your wiggly friends will produce a perfect seed-starting ingredient: organic fertilizer.
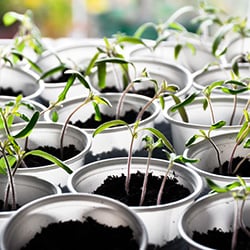
Certain plants, such as tomatoes and peppers, grow best when cultivated indoors before spring planting. The little plants have time to develop roots and grow strong before being subject to outdoor conditions. Growing starts extends the growing season. In the case of nightshades, most gardens cultivate a relatively small number of them, so each one counts.
Garden centers and nurseries cultivate food plants and put them out for sale as the spring approaches. This seems like an easy shortcut. Buyer, beware! Did you know these plants:
- have a limited selection of variety. If you want heirloom plants or special varieties, you will need to start from seed.
- have been treated with chemicals, except if they are organic.
- may be worse for wear after transportation and handling. How far did they travel?
- are more expensive than DIY
Choose Your Seeds
Look at your gardening plan. Choose which types of plants you would like to start in advance. If you are unfamiliar with this, do some research. When you purchase seeds, read the seed packet for more information. You can find seeds at grocery stores, gardening centers, hardware stores, natural food stores, and online. Uncle Jim’s Worm Farm offers a special selection of heirloom seeds.
Prepare Seed Start Containers
Each little plant will need a container to grow in. The container should have holes for drainage and room for a small root ball to form. The plants will not be full-grown when you transplant them outdoors. Therefore, you do not need full-sized pots. Small containers will do.
Your local gardening supply store offers containers for starts. You will find plastic seed flats that hold many plants. Small plastic pots — usually rectangular to save space — are useful. Gardening supply stores also have peat pots — these are designed to be buried in the ground after the plant forms. However, the store is going to charge you for them.
Saving small containers ahead of time is very economical. Look around the recycle bin. Single-serving yogurt tubs are just about the right size. Clean them and poke holes in the bottom. Egg cartons, toilet paper, and paper towel tubes, and cleaned paper coffee cups also make great seed start containers. A clamshell container with a clear lid makes a mini-greenhouse (poke holes in the top and bottom).
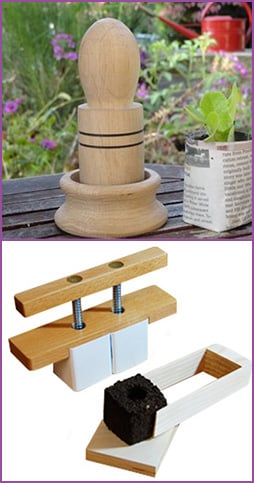 You can make your own pots from newspaper. The Paper Potter comes in two sizes. This tool presses sheets of newspaper into a perfect pot shape. Reduce the risk of transplant shock by placing the whole pot in the ground at planting time. Click to Order the Paper Potter – original or big.
Another shortcut is the Soil Cube Tool. Follow the package directions to make a seed-starting mix. Then, press the mixture into cubes. Insert seeds, water, and let the seedlings grow. The whole cube goes right into the ground. Click to Order the Soil Cube Tool.
You will likely need trays to put your containers on. A tray will catch any drainage and keep the seedlings together. This can be anything from a store-bought seedling tray to a serving tray to a boot tray.
Make a Seed Starting Mix
Using garden soil might sound convenient. However, soil directly from the garden has these flaws:
- Not porous enough for delicate roots
- May not manage moisture correctly
- Might be contaminated with weed seeds
You can make your own seed-starting mix. This recipe has three ingredients:
- 1/3rd compost from your composting bin
- 1/3rd sand, perlite, or vermiculite
- 1/3rd peat moss
Start by harvesting your compost. If you have a tray-based composter, this is a snap: just remove compost from the bottom tray. If your composter is outdoors, remove finished compost from the bottom, avoiding any uncomposted scraps on the top. Try to leave the worms behind in the bin.
Seed start mix should be a uniform size. If you have time, screen the compost. Screening removes sticks, composting worms, and undigested food. Screening also ensures the compost pieces are small in size.
If you don’t have any compost, no problem! Order finished compost from Uncle Jim’s Worm Farm.
If you are growing organically, make sure the peat moss is pure. The peat moss should not contain any additional items such as fertilizer or little round, white dots. Check the sand, perlite, or vermiculite for any contaminants.
Mix all three ingredients in a bucket or container. Add them to the pots, then add the seeds according to package directions. You will typically add 1 seed per small container. Water thoroughly and put them in the sun to sprout. These baby plants will get plenty of nutrients from the organic compost.
At Uncle Jim’s Worm Farm, we offer finished compost made by our worms in Pennsylvania. You can order composting worms (Red Worms are best for composting) and composters from us. We have been breeding worms for more than 25 years, and we are the #1 supplier of composting worms in the United States.


6 thoughts on “Make Your Own Seed-Starting Mix with Compost”
This is best for backyard gardening. By doing this, we can grow enough vegetables for healthy diet.
This is the most thourough and recourceful description of homemade seed starting mix. Thank you
Thank you thank you so much 4 the information on seed starting mix.
Can I substitute worm castings (purchased) for compost in the seed starter mix?
Yes, you certainly can!
Thanks for this excellent article. I was looking for a good “recipe” for using my worm castings for my seed starter cups, and you provide it! One comment – peat moss is not renewable and harvesting this disappearing resource causes a lot of environmental damage. I suggest looking into alternatives to peat, such as coconut coir, rice hulls, etc.