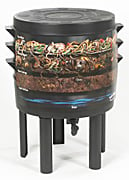
 When it comes to a Can-O-Worms, how do you maintain such a Worm Bin for vermicomposting purposes? Just like any worm composter, it will always need some care and upkeep. Not only will bacteria, fungi, insects and other microorganisms be present in the system, there will be worms to your care as well. These worms will also be the ones to help recycle your organic scraps at home, so it’s just suitable to look out for them, as if they were like your pets. Heed their needs, and they’ll be able to produce for you some nutrient-rich and valuable source of compost.
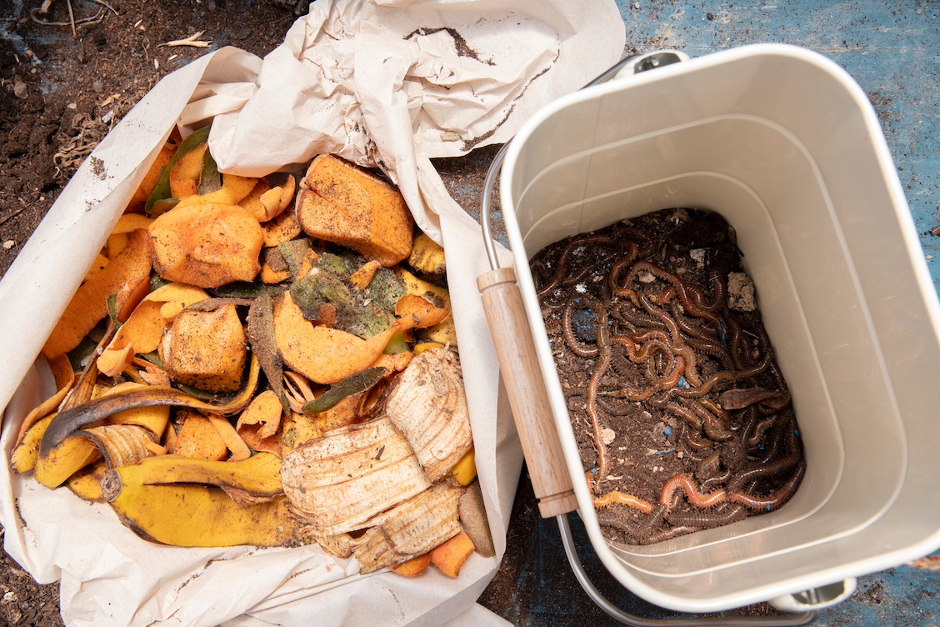
When it comes to composting, the best earthworm for the job are the Red wiggler worms. Red wigglers eat a lot (they can actually consume organic materials more than their weight for each day), can multiply in number real fast, and can live-off of spaces that are confined and congested. Unlike nightcrawlers that like to burrow and dislike being in congested places, red wigglers are the total opposite.
Now when it comes to the can o worms composter, coit’s a worm composting bin that’s actually easy to look after. It’s an odorless system that helps promote recycling, thus it being an environmental friendly unit. Other than that, it’s very handy to have at home, since you can easily place it indoors (beside your kitchen counter, under your sink, by your balcony) or outdoors. This user-friendly unit comes in a tray stacking system, has five legs, and also has a spigot by the base (for where to collect the liquid from the bin).
Maintenance for a can o worms worm farm is made easy, as harvesting the castings from worms is trouble-free. How? After the red wigglers have eaten mostly everything on the first tray, and have already produced their castings, they will then go up the next food source (the next tray). They will then have to leave behind their castings. You can just easily remove the first tray and harvest the castings from there, without having to disturb or remove the worms from the composter.
When it comes to making a worm farm, also make sure that the food that you put into the composter remains loose. You’ll be able to avoid compaction inside (both the bedding materials and the food) the bin if you put in some corrugated cardboard strips or some presoaked newspaper shreds. Not only will these help keep in that much needed moisture in the bin, it will also help keep the system dark, since worms prefer it more that way (they can be very sensitive to light and vibrations since they’re born with no eyes and ears, and only rely on their senses).
Your composting worms bin should also be kept regularly cleaned, and also be replenished with new bedding at least every two months (fluff the bedding or add in some more so that enough air will flow into the bin but do make sure that the ventilation holes aren’t blocked as well). You should also take out leftover scraps (if there are any) as these may cause an odor build-up in the system later on. Other than that, it may also bring about unwanted pest visits into the Can-O-Worms. So make sure to steer clear from raw materials being placed in the Worm Bin, such as stuff that are salty, oily, spicy, citrus-based, meat, poultry, and seafood.
Uncle Jim’s recommends the Can-O-Worms
 Practice recycling with the Can-O-Worms! Each of our Can-O-Worms contains a collector tray, five push-fit legs, and a plastic drainage. It also comes with a lid and 3 interchangeable working trays. A bedding block is also provided plus an instructional manual to help you set-up fast! Get yours with free shipping!
To know more about the product, check the Can-O-Worms here.




15 thoughts on “Maintaining a Can-O-Worms Worm Bin”
The can o worms only comes with two trays now. What’s the best way to harvest castings and remove worms without the third level?
You do the same with the 2 that you would with 3, you wait for your worms to move to the second bin and then start over, make new bedding in the freshly harvested bin and put it on top
When do you add the second tray? Instructions say it won’t be required for months but I reckon if I put it on top is there would be no gap to the soil where the worms are? Worried I’ll be squishing my worms when I go to add it.
Hi I have one of the original 3 tier ones and haven’t used it in years and want to start again but I can’t remember what I need to get and do. Can anyone help please
I am using a Can-o-Worms bin with three trays in my back yard. It makes a really fine compost but is very wet. I leave the bottom tray spigot open with a container under it. After it rains, the bucket is full of leachate. Is it safe to use on plants. A second question, although I am adding scraps to the upper most tray, even the bottom tray still has many worms after months of not adding to that tray. Do I just have lazy worms or will it take much longer for the worms to migrate?
I have a can of worm bin that have never used. Wanted to start this spring but cannot locate the top/lid. Can that be purchased individually?
I have the same problem, lower tray full of worms still and they dont want to move up a layer.. did you ever solve this problem?
Hi Gillyt,
If your worms are not migrating up it could be for a number of reasons. You want to make sure the holes in the tray above are large enough and not clogged. Make sure your farm isn’t too dry. The temperature in your farm could be off, and they are staying lower to keep cool. It might help to try and add some bedding to the top tray such as a damp newspaper or cardboard. If you haven’t already solved this issue I hope this helps!
I am confused about the tier system; where do i harvest compost from? how do i harvest without unintentionally removing all my worms? How long will it take for this to be something we should be doing? Sorry, complete novice here but very keen to learn!
I purchased a can-o-worms system, second hand, many years ago. I vermicomposted successfully back then, but i moved and my garden became a patio. Id been using the trays as planters for a good 6 years, but now im in a position to get back to my roots, and get some wrigglers back in there. Is there a downloadable version of the instructions? I want to make sure i have all my parts and that I start correctly.
Hello Jesi! We emailed you the instruction manual for the Can O Worms. I am also posting it here as well in case someone else needs it. Have a great day!
https://www.planetnatural.com/wp-content/uploads/canoworms-booklet.pdf
Can you mix Nightcrawler and red wigglers in the same bin?
Yes! Absolutely no issue with that.
I’ve read they don’t like the same temps.
One is cold hardy and the other is warm hardy. Reds like cramped conditions, euros like their space.
Do you have to water the bedding from time to time to keep it moist?