


Vermicomposting benefits for your garden
The Tiny Creatures That Could Save Your Garden — and the Planet
Earth Day just passed. Mother’s Day is right around the corner. And your garden? It’s waking up hungry after a long winter, craving exactly the kind of deep, lasting nourishment that no bag of chemical fertilizer can truly replicate.
Here’s what the garden centers don’t put on their signs: the most powerful soil amendment on Earth isn’t manufactured in a factory. It’s made by worms. Specifically, by billions of red wigglers working around the clock, converting your kitchen scraps into something so nutrient-dense, so biologically alive, that scientists have been studying it for decades and farmers have been using it for centuries.
We’re talking about vermicompost — worm castings — and if you’re not using it yet, your plants are missing out on the single biggest upgrade you can give your garden this spring.
This guide will walk you through everything: the science, the setup, the seasonal strategy, and why right now — post-Earth Day, pre-Mother’s Day — is the best possible moment to start. Whether you’re a weekend gardener with a small patio or a dedicated homesteader with raised beds in every corner of your yard, vermicomposting will change the way you grow.
⚡ Quick Summary (TL;DR)
- Vermicomposting uses earthworms to convert organic waste into nutrient-rich worm castings.
- Worm castings improve soil structure, boost nutrient availability, and increase beneficial microbial life — all backed by peer-reviewed science.
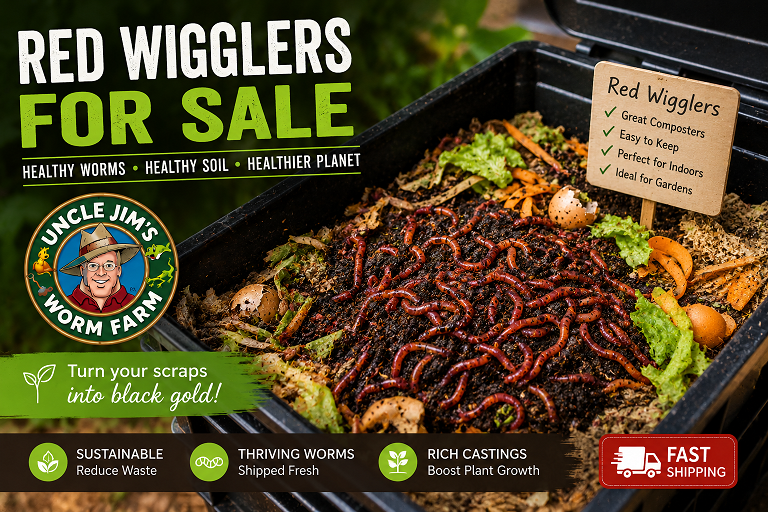
- Red wigglers (Eisenia fetida) are the best worm species for home composting.
- A basic setup takes less than 30 minutes and costs very little to start.
- Spring (now!) is the optimal season to start a bin and have castings ready for summer planting.
- Vermicompost can also be brewed into a liquid fertilizer called worm tea — a quick-acting soil boost.
What Is Vermicomposting, Really? (Beyond the Buzzword)
Let’s cut through the noise. You’ve probably heard the word “vermicomposting” tossed around at farmers markets, in gardening forums, or maybe in a viral video where someone dumps banana peels into a bin full of wriggling worms. But what’s actually happening in that bin?
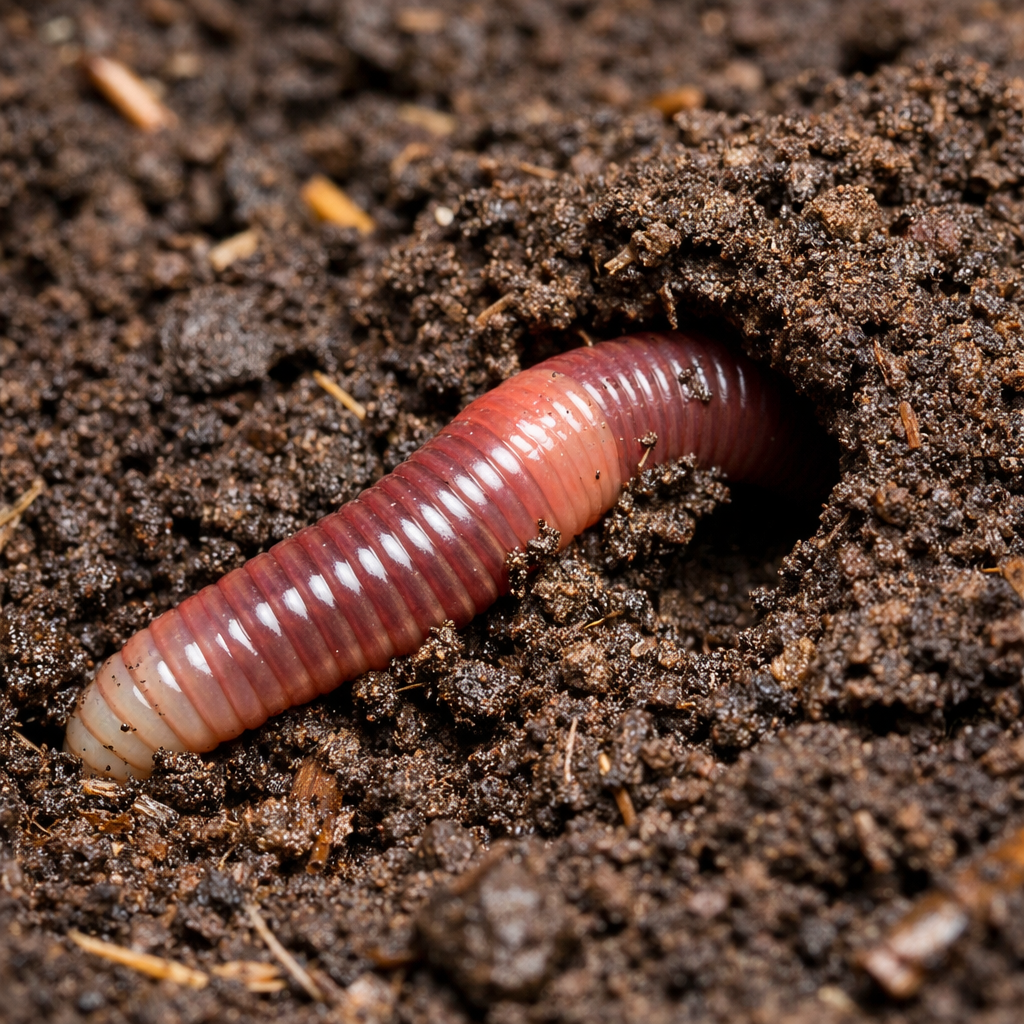
Vermicomposting is an organic waste management process that uses earthworms — primarily species like Eisenia fetida (red wigglers) and Eisenia hortensis (European nightcrawlers) — to break down organic material into a dark, crumbly, extraordinarily fertile substance called vermicompost, or worm castings.
Unlike traditional composting, which relies primarily on heat-driven microbial decomposition, vermicomposting works at ambient temperatures and leverages the digestive biology of earthworms to do the heavy lifting. The result is a product that’s richer in plant-available nutrients, more biologically diverse, and faster to produce than hot compost.
The worm bin — the controlled environment where all of this happens — can be as small as a shoebox-sized container under your kitchen sink or as large as a multi-tray system in your garage. The worms don’t care about square footage. They care about food, moisture, and temperature. Get those right, and they’ll work tirelessly to turn your vegetable peels and coffee grounds into something extraordinary.
The byproduct isn’t just compost. It’s a living ecosystem in concentrated form: teeming with bacteria, fungi, and actinomycetes that continue to feed and protect your plants long after you’ve applied it to the soil. More on that in a moment.
The Science Your Garden Has Been Waiting For
We could just tell you “worm castings are great.” But you deserve better than that. So let’s look at what the research actually says.
Inside the Worm’s Digestive System: A Miniature Composting Factory
Earthworms are remarkably sophisticated biological machines. As organic matter passes through a red wiggler’s body — from the mouth, through the crop, into the gizzard (where grit helps grind it up), and finally through the intestine — it’s transformed by a cascade of enzymes and beneficial microorganisms. What comes out the other end isn’t waste in any meaningful sense. It’s a biochemically enriched material that plants can readily use.
The worm’s gut creates the perfect conditions for microbial amplification. The castings that result are colonized with populations of bacteria, fungi, and actinomycetes that remain biologically active in your soil — continuing to break down organic matter, release nutrients, and suppress pathogens even after application.
This is the key difference between synthetic fertilizers and vermicompost: synthetic fertilizers deliver a chemical nutrient load. Vermicompost delivers a living biological system that generates nutrients continuously over time.
What Peer-Reviewed Research Actually Shows
The scientific community has been paying close attention to vermicompost for decades, and the evidence is compelling:
Soil structure: Research published in peer-reviewed journals confirms that vermicompost-treated soils show measurably better aeration, porosity, bulk density, and water retention compared to untreated controls. This is the physical foundation of plant health — roots need air, water, and space to grow.
Nutrient availability: A 2024 study published in Frontiers in Sustainable Food Systems found that vermicompost application increased total soil carbon, total nitrogen, and the activity of nutrient-cycling enzymes, compared to soils receiving only inorganic fertilization. Plants in vermicompost-amended soils showed improved nutritional quality in harvestable produce.
Water retention: A 2024 study from the National Center for Biotechnology Information found that even a single vermicompost application significantly improved plant available water capacity, particularly in sandy, coarse-textured soils — the type that struggles most in summer heat and drought conditions.
Microbial diversity: The U.S. EPA recognizes composting as a key strategy for reducing organic waste and its associated greenhouse gas emissions. When you vermicompost, you’re not just feeding your garden — you’re actively reducing methane production from landfills.
Crop performance: A comprehensive review in MDPI Soil Systems confirmed that vermicompost improves soil quality, increases nutrient availability, boosts crop productivity, and enhances pest and disease tolerance across a wide range of crops including maize, wheat, rice, and barley.
The verdict from science is unambiguous: vermicompost isn’t a gardening trend. It’s one of the most effective soil amendments ever studied.
The Real Benefits of Vermicomposting for Your Garden (In Plain English)
Science is great. But let’s translate it into what you’ll actually see, feel, and grow in your backyard this season.
1. Dramatically Better Soil Structure
Healthy soil isn’t just dirt. It’s a complex, porous matrix of organic matter, mineral particles, air pockets, and water channels. When soil structure breaks down — from compaction, chemical fertilizer overuse, or simple neglect — roots can’t penetrate, water pools or runs off, and plants struggle even with adequate nutrients.
Worm castings act like a biological engineer for your soil. The organic matter they contain binds soil particles together into stable aggregates, creating a structure that holds moisture without becoming waterlogged, allows air to circulate around roots, and resists compaction over time. Think of it as upgrading your soil from concrete to a well-structured sponge.
This effect is especially dramatic in two common problem soils: heavy clay (which compacts and drains poorly) and sandy loam (which drains too fast and holds almost no water). Vermicompost improves both — not by masking the problem with nutrients, but by fundamentally changing the physical properties of the soil.
2. A Steady, Balanced Nutrient Supply
Worm castings are rich in the big three plant macronutrients — nitrogen (N), phosphorus (P), and potassium (K) — as well as magnesium, calcium, and a range of micronutrients that synthetic fertilizers often don’t include.
But the real advantage isn’t the nutrient content per se. It’s the delivery mechanism. Unlike synthetic fertilizers that release a concentrated chemical burst (which can burn roots, cause nutrient imbalances, and leach into groundwater), vermicompost releases nutrients slowly and steadily as microorganisms continue to break down the organic matter. Your plants get a consistent, gentle supply of exactly what they need — more like a subscription meal plan than a fast-food binge.
This slow-release effect also means you’re less likely to overfertilize, which is one of the most common mistakes home gardeners make. With vermicompost, it’s remarkably difficult to harm your plants through application.
3. An Explosion of Beneficial Microbial Life
This is the benefit most gardeners don’t fully appreciate — and it may be the most important one of all.
Healthy soil is not a sterile growing medium. It’s a living ecosystem, teeming with billions of bacteria, fungi, protozoa, and other organisms that form complex relationships with plant roots. These microscopic allies help plants absorb nutrients more efficiently, protect against pathogens, and communicate stress responses across root networks.
Vermicompost is the single richest source of beneficial soil microbes you can add to your garden. The castings themselves are colonized with diverse microbial populations that immediately begin enriching your soil’s ecosystem upon application. Beneficial fungi form mycorrhizal networks. Bacteria outcompete harmful pathogens. Actinomycetes produce natural antibiotic compounds that suppress soil-borne diseases.
The result? Plants that are demonstrably more resistant to disease, pests, and stress — without you spraying a single chemical.
4. Natural Disease Suppression
One of vermicompost’s most remarkable and consistently documented properties is its ability to suppress plant diseases. Research has shown it effective against common fungal pathogens including Pythium, Rhizoctonia, and Fusarium — the culprits behind damping-off, root rot, and a host of other frustrating garden problems.
The mechanism is elegant: the dense, diverse microbial community in worm castings simply outcompetes pathogenic organisms for resources and space. It’s biological pest control, built into your soil amendment.
5. Environmental Impact — The Bigger Picture
When you fill a worm bin instead of a trash bag, you’re doing something meaningful beyond your property line. Organic waste in landfills decomposes anaerobically — without oxygen — producing methane, a greenhouse gas roughly 80 times more potent than CO₂ over a 20-year period. The EPA estimates that food waste is one of the largest contributors to U.S. methane emissions.
A single household vermicomposting system can divert hundreds of pounds of organic waste from landfills annually, while simultaneously returning those nutrients to local soil rather than losing them to degradation. It’s one of the most effective individual environmental actions a person can take — and the garden benefits are a bonus.
This Earth Day season, that feels worth saying out loud.
Choosing Your Worms: Not All Wrigglers Are Created Equal
This is where many first-time vermicomposters make their first mistake: they grab a handful of earthworms from the garden and expect them to thrive in a bin. Those worms — typically common nightcrawlers (Lumbricus terrestris) — are soil dwellers adapted to burrowing deep into the earth, not surface composters built for life in a worm bin. They won’t survive, and your composting project will stall before it starts.
The worm you want is Eisenia fetida — the red wiggler. Here’s why they dominate the vermicomposting world:
- Voracious appetite: Red wigglers can consume up to half their body weight in organic material every single day. A pound of worms (roughly 1,000 individuals) can process several pounds of kitchen scraps per week under ideal conditions.
- Surface dwellers: Unlike soil-burrowing earthworms, red wigglers thrive in the top few inches of decomposing organic matter — exactly the zone of a worm bin.
- Rapid reproduction: Under good conditions, red wiggler populations can double every 60–90 days. Your initial investment multiplies itself.
- Temperature tolerance: They’re comfortable across a wide range (55–77°F / 13–25°C), making them adaptable to most home environments year-round.
- Hardiness: These worms have been bred and selected for composting performance over generations. They know what they’re doing.
A strong second option is the European nightcrawler (Eisenia hortensis). Larger than red wigglers and known for deeper burrowing habits, European nightcrawlers produce excellent castings and are particularly popular with gardeners who also want worms for fishing. They work more slowly than red wigglers but are equally hardy.
Uncle Jim’s Pro Tip: For most home composters, start with red wigglers from Uncle Jim’s Worm Farm. We’ve been raising composting worms for over 40 years, and every shipment comes with live delivery guarantee and care instructions. Don’t waste time or money on worms that aren’t purpose-bred for composting.
How to Set Up Your First Worm Bin: A No-Stress Beginner’s Guide
The internet is full of elaborate, intimidating vermicomposting setups. Ignore them. A successful worm bin doesn’t require engineering skills or a substantial budget. Here’s what you actually need:
Step 1: Choose Your Container
You have two main options: purchase a purpose-built worm bin from Uncle Jim’s (which comes with proper ventilation, drainage, and everything sized correctly) or repurpose a plastic storage container. If you go the DIY route, choose a container that’s at least 12 inches deep, drill small holes (1/4 inch) in the bottom for drainage and in the sides near the top for airflow, and place a tray underneath to catch excess liquid (more on that liquid gold later).
Bin size depends on how much organic waste your household generates. A 10-gallon bin suits a single person or couple; a 20+ gallon setup handles a family of four. Start conservative — you can always scale up.
Step 2: Prepare Your Bedding
Bedding is the material that fills the bin, gives worms a habitat, and balances the carbon-to-nitrogen ratio of your system. The best bedding materials include:
- Shredded newspaper (non-glossy, black ink) — classic, affordable, worms love it
- Cardboard torn into small pieces — excellent carbon source
- Coconut coir — available at garden centers, holds moisture beautifully
- Aged compost — adds microbial life from the start
- Dried leaves — seasonal and free
Moisten your bedding before adding it to the bin. The target consistency is a wrung-out sponge — damp throughout, but not dripping. Fill the bin to about 4–6 inches of depth, then add a small handful of garden soil or finished compost to introduce native microorganisms. This jumpstarts the biological ecosystem your worms need to thrive.
Step 3: Introduce Your Worms
Place your worms gently on top of the prepared bedding. They’ll instinctively burrow into the damp, dark environment. Give them a day to acclimate before adding food — let them settle in and explore their new home.
Placement matters: keep the bin in a location where temperature stays between 55–77°F year-round. Ideal spots include a basement, garage, mudroom, under the kitchen sink, or in a shaded outdoor area during spring and fall. Avoid direct sunlight (worms are photosensitive and will flee), and avoid locations where temperatures drop below 40°F or rise above 85°F.
Step 4: Start Feeding
Begin with small amounts — a cup or two of food scraps — and bury them under the bedding in one section of the bin. This burial technique is critical: it prevents odors, discourages pests, and helps worms locate their food efficiently.
Excellent worm foods:
- Fruit and vegetable scraps (especially leafy greens, melon rinds, coffee grounds)
- Coffee grounds and paper filters
- Tea bags (remove staples)
- Eggshells (dried and crushed — these help the worms’ gizzards and neutralize pH)
- Aged bread in small amounts
Foods to avoid:
- Meat, fish, and bones — attract pests and create odors
- Dairy products — same issue
- Oily or heavily processed foods
- Citrus in large quantities — too acidic
- Onions and garlic in excess — worms dislike them
For a detailed breakdown, check out our complete worm feeding guide.
Maintaining Your Worm Bin: The Non-Negotiables
Once your bin is running, it practically manages itself — but a few regular checks will keep everything humming.
Moisture Management
This is the #1 factor that determines whether your bin thrives or struggles. Worms breathe through their skin and require consistent moisture to survive. Too dry, and they can’t move or feed. Too wet, and anaerobic conditions develop, producing foul odors and potentially harming your worm population.
Check moisture every few days, especially in the early weeks. If the bedding feels dry when you touch it, mist with water. If it’s waterlogged, add dry shredded paper to absorb excess liquid. Consistent monitoring takes about 30 seconds and prevents most common bin problems.
Feeding Rhythm
Overfeeding is the second most common beginner mistake. Add food only when the previous addition has been mostly consumed — every 3–5 days to start, then calibrate based on how quickly your worms eat. A thriving bin with a healthy worm population will process food faster than a newly established one.
Rotate feeding locations around the bin to distribute activity and castings evenly. This also helps you avoid anaerobic hot spots where food accumulates without adequate worm attention.
Aeration
Every week or two, gently turn the top layer of the bin with a trowel or your hands (gloves optional — worms won’t bite and castings are completely safe). This aerates the material, prevents compaction, and redistributes worms and microbes throughout the bin. You’ll notice the worm population naturally gravitating toward fresh food — which is also your harvesting advantage, as we’ll explain next.
Troubleshooting: When Things Go Wrong (And How to Fix Them Fast)
Even experienced vermicomposters encounter occasional hiccups. Here’s how to handle the most common scenarios without panic:
Problem: Foul Odors
Cause: Almost always anaerobic conditions from excess moisture or overfeeding.
Fix: Stop feeding temporarily. Add dry bedding material (shredded newspaper works fast). Ensure drainage holes are unobstructed. Turn the bin to introduce air. The smell should resolve within a day or two.
Problem: Fruit Flies or Fungus Gnats
Cause: Food scraps exposed on the surface, or bin too moist.
Fix: Always bury food under 2–3 inches of bedding. Add a thick layer of dry bedding on top to create a physical barrier. Reduce moisture. A piece of damp cardboard laid on top of the bedding also works beautifully as a fruit fly deterrent — they can’t penetrate it.
Problem: Worms Trying to Escape
Cause: Unfavorable conditions — temperature extremes, excess moisture, or the worms need time to acclimate after a new setup.
Fix: Leave a light on near the bin for 24–48 hours after initial setup (worms avoid light and will burrow in). Check temperature and moisture. Ensure there’s adequate food in the bin — worms won’t wander if they’re comfortable and fed.
Problem: Mites or Other Tiny Insects
Cause: Usually attracted to specific foods (sweet fruits, starchy scraps).
Fix: Reduce the offending food. Add dry bedding. In most cases, small mite populations are harmless and actually assist in decomposition. Large infestations are typically a moisture problem — dry things out and they’ll decrease.
Need more help? Our blog and FAQ section cover dozens of specific scenarios with step-by-step solutions.
Harvesting and Using Your Vermicompost: The Payoff
After 60–90 days of active composting, you’ll notice the bottom of your bin filling with dark, coffee-ground-textured material that smells like fresh earth. That’s your finished vermicompost, and it’s time to harvest it.
Harvesting Methods
The Migration Method (Easiest): Push all existing bin contents to one side. Add fresh, damp bedding and food to the empty side. Over the next 1–2 weeks, your worms will migrate toward the food-rich new side. Once they’ve moved, the finished castings on the other side are worm-free and ready to use.
The Light Method: Dump the bin contents onto a tarp in bright light. Worms will naturally burrow into the center of each pile to escape the light. After 20–30 minutes, scoop the outer layer of finished castings. The worms remain in the center pile and go back into the bin.
The Screen Method: Use a 1/4-inch mesh screen to sift castings from worms and unfinished material. Return everything that doesn’t pass through the screen to the bin. This method gives you the cleanest finished product fastest.
How to Apply Vermicompost in Your Garden
- Mix into potting soil: Use a ratio of roughly 20–25% vermicompost to potting mix for container plants. Perfect for seedlings and transplants.
- Top dressing: Spread a 1/4 to 1/2-inch layer around existing plants and water in lightly. The castings will slowly incorporate into the soil with each watering.
- Garden bed amendment: Work 1–2 inches of vermicompost into the top 4–6 inches of garden bed soil before planting. Ideal for spring bed prep.
- Transplant boost: Add a handful of castings to the planting hole when transplanting seedlings or shrubs. Gives roots immediate access to nutrients and microbial support.
Worm Tea: The Liquid Bonus
That liquid collecting in the tray under your bin? That’s leachate — a diluted byproduct of the composting process. While it’s not the same as true worm tea (which requires brewing), it can be diluted 1:10 with water and applied around plants as a supplemental soil drench.
For a more potent liquid fertilizer, make actual worm tea: steep a generous handful of finished castings in a gallon of dechlorinated water for 24–48 hours, stirring or aerating periodically. Strain and apply immediately as a foliar spray or root drench. Worm tea delivers a microbial boost that’s nearly as impactful as applying the castings directly — and it covers much more ground per ounce of castings.
Spring + Mother’s Day: Two Perfect Reasons to Start Right Now
We’re in a sweet spot on the calendar. Earth Day has just passed — a moment that reminds us why practices like vermicomposting matter beyond our own backyards. And Mother’s Day is just weeks away.
If the gardener in your life (or your own inner gardener) has been thinking about starting a worm bin, there is no better time than right now, for two very practical reasons:
Seasonally: Starting a bin in late April or early May means your first batch of finished castings will be ready right when your garden needs it most — mid-to-late summer, when heat and drought stress test your plants. You’ll have homegrown soil amendment ready at exactly the right moment.
As a gift: A worm composting kit from Uncle Jim’s is one of the most thoughtful, genuinely useful gifts you can give a gardening enthusiast this Mother’s Day. It’s not a bouquet that wilts in a week. It’s a living system that keeps giving — literally — for years. For the mom, aunt, grandmother, or friend who’s passionate about growing things sustainably, it’s the gift that feeds both the garden and the planet.
Frequently Asked Questions About Vermicomposting
Q: What are the main benefits of vermicomposting?
Vermicomposting improves soil structure, increases plant-available nutrients (N, P, K plus micronutrients), dramatically boosts beneficial microbial diversity, suppresses plant diseases naturally, and diverts organic household waste from landfills — reducing methane emissions in the process.
Q: What worms are best for vermicomposting?
Red wigglers (Eisenia fetida) are the gold standard — voracious eaters, fast reproducers, and perfectly adapted for life in a compost bin. European nightcrawlers (Eisenia hortensis) are an excellent second option, especially for larger systems or gardeners who also want fishing bait. Never use common garden earthworms — they’re not suited for bin composting.
Q: How long does it take to produce finished vermicompost?
With a well-established bin, healthy worm population, and consistent feeding, you can have finished castings in as little as 60–90 days. Smaller populations or seasonal temperature changes may extend this to 3–4 months. The process is not something you can rush — but it’s also almost entirely hands-off.
Q: Can vermicompost replace chemical fertilizers?
For most home gardeners, yes — especially for established beds and container plants. Worm castings release nutrients slowly and in plant-available forms, without the risk of chemical burn or groundwater contamination. They also deliver biological benefits (disease suppression, microbial diversity) that no synthetic fertilizer can replicate.
Q: Does a worm bin smell?
A properly managed worm bin smells like fresh earth — pleasant and clean. Foul odors are a sign of overfeeding or excess moisture, both of which are easy to correct. Thousands of Uncle Jim’s customers keep worm bins in their kitchens, offices, and apartments without any odor complaints.
Q: Is vermicomposting good for the environment?
Absolutely. According to the EPA, organic waste in landfills is a significant source of methane — a potent greenhouse gas. By vermicomposting, you divert that waste from landfills, return nutrients to local soils naturally, and reduce reliance on synthetic fertilizers whose production is energy-intensive and environmentally costly. It’s one of the most impactful environmental choices an individual household can make.
What’s Next? Your Action Plan for a Better Garden This Season
🌱 Ready to Transform Your Garden? Here’s Where to Start:
- Get your worms: Shop Red Wigglers at Uncle Jim’s Worm Farm →
- Get your bin: Browse Worm Bins & Composting Systems →
- Get a complete kit (perfect for Mother’s Day!): See Worm Composting Starter Kits →
- Deepen your knowledge: Read our guide Getting Started With Vermicomposting →
- Explore more on the blog: See All Blog Posts →
Questions? Email our team at sales@unclejimswormfarm.com — we’ve been answering worm questions for over 40 years and love helping new composters get started.
The Bottom Line: Your Soil Deserves Better
Gardens don’t fail for lack of effort. They fail for lack of biology. The living ecosystem beneath your plants’ roots is where growth either happens or doesn’t — and vermicompost is the single most effective way to restore, rebuild, and amplify that ecosystem.
The science is clear. The results are real. And the barrier to entry has never been lower: a bin, some bedding, a pound of red wigglers from Uncle Jim’s, and a bag of kitchen scraps you’d otherwise throw away. That’s it. That’s the whole investment.
Earth Day reminded us that every choice we make has a ripple effect. Mother’s Day reminds us to nurture the things we love. Vermicomposting sits beautifully at the intersection of both — a practice that feeds your garden, honors the earth, and connects you to one of nature’s most ancient and elegant systems.
Your soil has been waiting for this. So have your plants. So, arguably, have the worms.
Start your vermicomposting journey today at Uncle Jim’s Worm Farm.
📌 About the Author
Uncle Jim’s Worm Farm Team
Uncle Jim’s Worm Farm is the largest worm farm in the United States, with over 40 years of experience raising and shipping composting worms, nightcrawlers, and mealworms to gardeners, farmers, educators, and homesteaders across the country. Our team includes experienced vermiculture specialists, garden educators, and lifelong composters committed to making sustainable growing accessible for everyone. Learn more about our story at unclejimswormfarm.com/about.
All recommendations in this article are based on our team’s direct vermiculture experience, supported by citations from peer-reviewed scientific literature and guidance from the U.S. EPA and agricultural extension universities.


One thought on “The Tiny Creatures That Could Save Your Garden — and the Planet”
Very informative post. Vermicomposting not only reduces organic waste but also creates nutrient-rich compost that supports stronger root growth and healthier plants. More gardeners should consider adding vermicompost to their soil management practices. Thanks for sharing this valuable information!